One of the most popular questions I see is "How do I acquire a macbook air?". While I'll try to address that question specifically, I want to widen the scope because it applies to any mac system that need to be imaged.
When dealing with a macbook air your options are somewhat limited.
- There's no firewire
- There's no network card (unless you use the usb port)
Well obviously if the box is on you can use F-response to acquire it rather quickly. You can only do this however if you have the proper credentials.
What if you're going in clandestinely? What if the system is handed to you and it's off? This is where Raptor Forensics bootable CD comes in.
Burn the iso
Attach a powered USB hub to the macbook air.
Attach a USB target drive formatted however you see fit(though you can do this within Raptor).
Attach a USB cd drive.
Insert the cd.
Boot the mac while holding down 'c'.
The environment will boot.

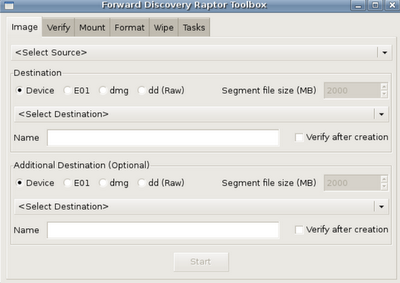
After the system boots click on the Raptor Toolbox. When it opens you'll see the following.

This is where my biggest problem with tool originates. The workflow from left to right is all out of whack. In order to acquire an image, you need to mount the target drive. In order to mount the target drive it needs to be formatted. In order to be formatted it should be wiped. Now, you've probably already done this but in my opinion, and in terms of workflow in this toolkit it should be changed.
That said, let's format and mount a target drive. First, click the 'format' tab.

Next, Click the 'mount' tab and select your target device. You'll want it to be read/write.

Great! Now that it's formatted and mounted let's acquire something!
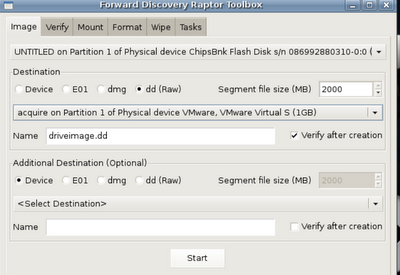
In this case I'm imaging a USB key, but it works just fine for the macbook air and other macs. Since everything is point and click it's a pretty straight forward process. Just select the source, target, name and make sure you select 'verify' and then Start.

An imaging window will appear as well as a verification window (which looks the same) when the time comes.
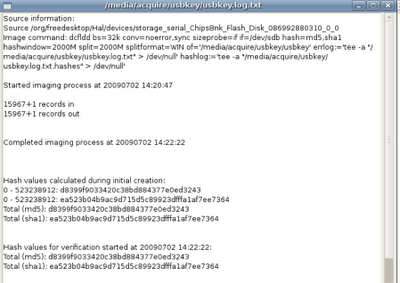
 Once acquisition and verification complete you'll see a nice log window appear that shows the acquisition command line and hashes.
And it's just that simple. Hopefully this helps those in need. Raptor Forensics is a great utility to include in your kit and there are 239 reasons it's better than helix for this purpose.
6 comments:
Good stuff, thanks.
Thanks Hogfly, looks good, I heard of Raptor but have not used it before. You ever tried/successfully used the E01 output? I ask as GSI always spout on about non-Encase generated E01's not being supported etc etc
Hi! I saw your comment on the workflow order. It stems from a different point of view on how things are setup. It is geared towards minimizing error on the onsite, tasks are from the most to the least common used on site (in my opinion) left to right.
From there, I normally wipe drives at the conclusion of processing a case, not at the beginning of a new one. Additionally, I normally format from a system that does not have the drive to be imaged attached.
So, then you just have to know one of the tricks. It bugged me that you had to switch to the Mount tab to setup your destination. So I made that go away. :) You can select an unmounted partition for your output, and it will automatically mount it for you as a part of the imaging process.
As such, you never have to leave the Image tab when you are on the evidence. Eh, I'm still not sure it's perfect. But I did think about it for awhile.
Of course if you want to switch it around, the entire GUI is in an XML file at the bottom of the code. Just shift the blocks "<object class="notebookpage">...</object>" into the order that you'd prefer.
Dave,
Thanks for the comment, and the tool. That makes sense, and thanks for the tip for editing!
ddewildt,
I tend not to image in E01 format if I can help it. It makes it a lot easier for to analyze with multiple tools.
hogfly -- You can image to E01 and still throw into any tool you'd like. You can try it out using Raptor. First image a test drive to E01 on the Image tab then switch over to the Mount tab. You can "mount" the E01 file from the drop down. You will actually get two mounts happening in the background. The first will "mount" the E01 file and give you a file for the drive and each partition. The next mount will mount each of the partitions as a filesystem. I'm pretty sure the GUI limits you to read-only mounts for E01 files, but if you have the latest version of Raptor that limitation doesn't exist at the command line.
All possible with libewf + mount_ewf (http://sourceforge.net/projects/libewf/).
Post a Comment